Gemini CLI is a powerful AI assistant that runs directly inside your Terminal. With Gemini CLI, you can generate code, explain scripts, debug errors, summarize files, and automate development tasks without leaving the command line.
Since FunOS is based on Ubuntu, installing Gemini CLI on FunOS is straightforward. In this tutorial, we will install Node.js using nvm (Node Version Manager) and then install Gemini CLI globally using npm.
What is Gemini CLI?
Gemini CLI is a command-line interface tool developed by Google that allows users to interact with Google’s Gemini AI models directly from the Terminal.
With Gemini CLI, you can:
- Ask technical questions
- Generate Bash, Python, or other programming code
- Debug errors from log files
- Refactor scripts
- Summarize documentation
- Analyze project files
Gemini CLI supports interactive mode and one-line command mode, making it flexible for both casual use and professional development workflows.
Official documentation:
https://geminicli.com/docs/
How to Install Gemini CLI on FunOS
Work on: 22.04.5 ✅ | 24.04.4 ✅ | 25.10 ✅ | 26.04 ✅
We will first install Node.js using nvm, then install Gemini CLI.
Step 1: Open a Web Browser
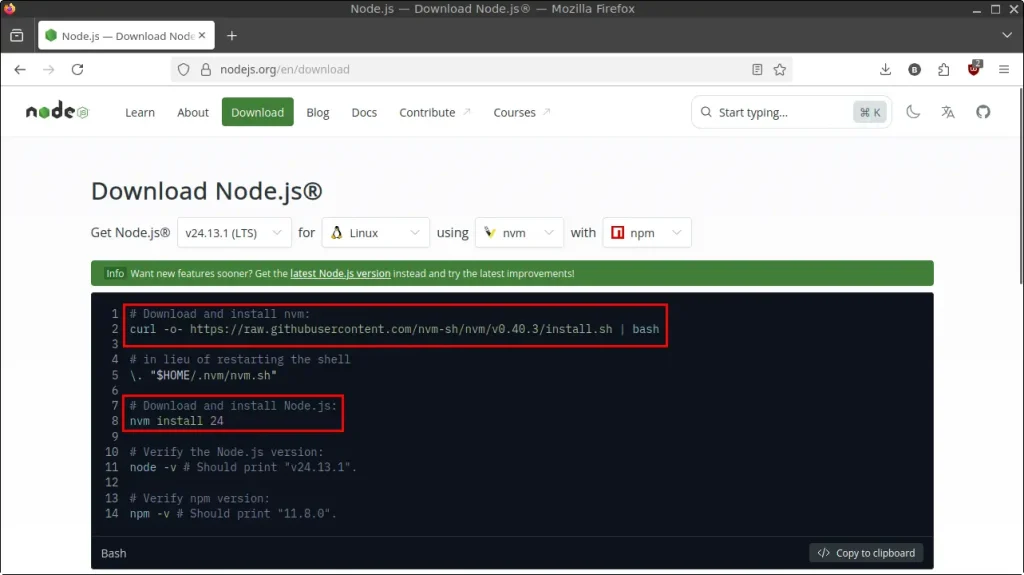
Open your preferred web browser and go to: https://nodejs.org/en/download
On that page, look for the sections:
- # Download and install nvm:
- # Download and install Node.js:
We will use the commands displayed there to install nvm and Node.js.
Step 2: Open a Terminal
There are three ways to open Terminal in FunOS:
- Click Menu in the lower-left corner of the screen, then click Terminal
- Click the Terminal icon in the Tray
- Press Ctrl + Alt + T
Step 3: Install nvm (Node Version Manager)
Run the command shown in the “# Download and install nvm:” section on the Node.js website.
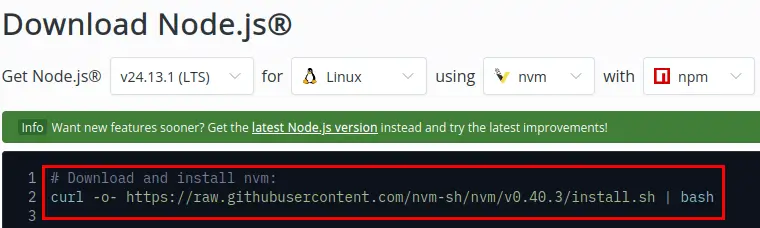
For example:
curl -o- https://raw.githubusercontent.com/nvm-sh/nvm/v0.40.5/install.sh | bashThis command will download and install nvm into your home directory.
Step 4: Reload the Shell
Before installing Node.js, reload your shell configuration:
source ~/.bashrcThis ensures the nvm command is available in the current Terminal session.
Step 5: Install Node.js
Now run the command shown in the “# Download and install Node.js:” section.
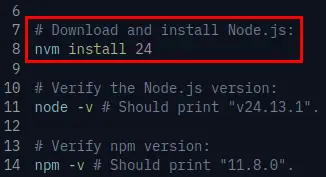
For example:
nvm install 24This installs Node.js version 24.
You can verify the installation with:
node --version
npm --version
If both commands display version numbers, Node.js and npm are installed correctly.
Step 6: Install Gemini CLI
Now install Gemini CLI globally:
npm install -g @google/gemini-cliVerify installation:
gemini --versionIf a version number appears, Gemini CLI is successfully installed.
How to Use Gemini CLI
Gemini CLI supports two modes: Interactive Mode and One-Line Command Mode.
1. Interactive Mode
Run the following command:
geminiYou will see:
Do you trust this folder?
Trusting a folder allows Gemini to execute commands it suggests. This is a security feature to prevent accidental execution in untrusted directories.

● 1. Trust folder (bustami)
  2. Trust parent folder (home)
  3. Don't trust
Press Enter.
Next question:
? Get started

  How would you like to authenticate for this project?

  ● 1. Login with Google
    2. Use Gemini API Key
    3. Vertex AI

  No authentication method selected.

  (Use Enter to select)

  Terms of Services and Privacy Notice for Gemini CLI

  https://github.com/google-gemini/gemini-cli/blob/main/docs/tos-privacy.md
Press Enter to select the first option:
Login with Google
Then you will see:
Code Assist login required. Opening authentication page in your browser.

Do you want to continue?

● 1. Yes
  2. No
Press Enter to select Yes.
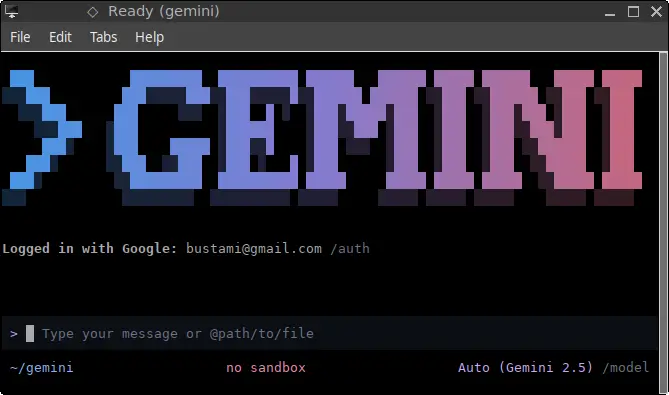
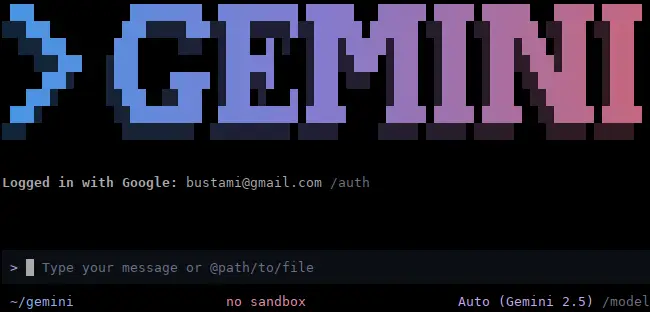
Your web browser will open. Log in with your Google account.
After successful authentication:
- Close the browser
- Return to Terminal
- Press r to restart Gemini CLI
Now Gemini CLI is ready to use in Interactive Mode.
To Exit Interactive Mode
Press:
Ctrl + CPress Ctrl + C twice if necessary.
2. One-Line Command Mode
You can also use Gemini CLI directly with a single command.
a. Basic Prompt
gemini "Explain how systemd works in Linux"b. Generate Code
Create a Bash script:
gemini "Write a bash script to back up /home to /mnt/backup"Generate Python code:
gemini "Create a Python HTTP server using Flask"c. Explain Existing Code
Explain a file:
gemini explain main.pyOr pipe file content:
cat main.py | gemini "Explain this code"d. Refactor or Improve Code
gemini "Refactor this script to improve readability" < script.she. Debug an Error
gemini "Why does this error occur?" < error.logOr inline:
gemini "Fix this Python error: TypeError: unsupported operand type(s)"For more advanced usage, visit:
How to Uninstall Gemini CLI on FunOS
If you no longer need Gemini CLI, you can remove it completely.
Step 1: Uninstall Gemini CLI
npm uninstall -g @google/gemini-cliStep 2: Remove Gemini User Data (Optional)
rm -rf ~/.geminiThis removes local Gemini configuration files.
Step 3: Uninstall Node.js (Optional)
If you installed Node.js using nvm:
nvm deactivate
nvm uninstall 24
Replace 24 with the version you installed.
Step 4: Uninstall nvm (Optional)
1. Delete the nvm Directory
rm -rf ~/.nvm2. Remove nvm From ~/.bashrc
Open your .bashrc:
mousepad ~/.bashrcLook for the following lines:
export NVM_DIR="$HOME/.nvm"
[ -s "$NVM_DIR/nvm.sh" ] && \. "$NVM_DIR/nvm.sh"
[ -s "$NVM_DIR/bash_completion" ] && \. "$NVM_DIR/bash_completion"
Delete those lines.
Save and close Mousepad.
3. Reload the Shell
source ~/.bashrcNow nvm is fully removed.
Step 5: Remove npm User Data (Optional)
rm -rf ~/.npmFrequently Asked Questions (FAQ)
Is Gemini CLI free to use on FunOS?
Yes, Gemini CLI provides a free authentication option using a Google account.
Does Gemini CLI work on Ubuntu-based systems?
Yes. Since FunOS is based on Ubuntu, Gemini CLI works without modification.
Do I need sudo to install Gemini CLI?
No. If you use nvm, you do not need sudo to install Node.js or Gemini CLI.
Conclusion
Gemini CLI is a powerful AI assistant that runs directly in your Terminal and helps you generate code, debug scripts, and improve productivity. Because FunOS is Ubuntu-based, installing Gemini CLI is simple and straightforward using nvm and npm.
By following this guide, you have successfully:
- Installed nvm
- Installed Node.js
- Installed Gemini CLI
- Learned how to use it
- Learned how to uninstall it if needed
You can now take advantage of AI assistance directly from your FunOS Terminal to enhance your workflow and development experience.