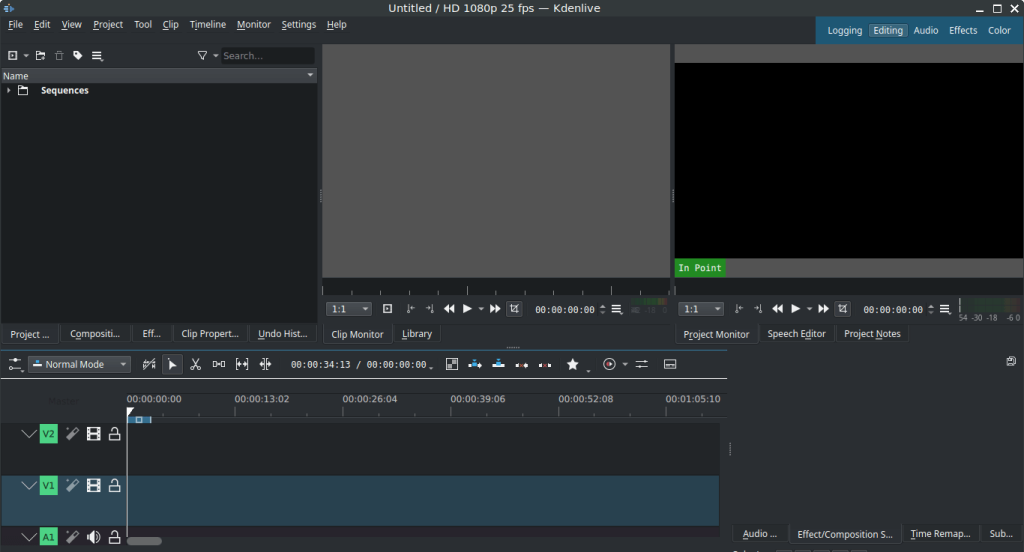
Kdenlive is one of the most powerful open-source video editors available today, widely used by content creators, filmmakers, and hobbyists. With its professional-grade tools and user-friendly interface, Kdenlive makes video editing accessible to everyone, from beginners to advanced users. On FunOS, installing Kdenlive is straightforward thanks to the vast Ubuntu repositories that FunOS is based on. This article will guide you through the steps to install, launch, and, if necessary, uninstall Kdenlive on your FunOS system.
What is Kdenlive?
Kdenlive (KDE Non-Linear Video Editor) is a free and open-source video editing software developed as part of the KDE project. It provides a non-linear editing experience, which means you can arrange and manipulate video and audio clips in a flexible timeline without altering the original files.
Some of Kdenlive’s key features include:
- Multi-track video editing with an intuitive timeline.
- Support for a wide variety of video and audio formats thanks to the FFmpeg library.
- Customizable interface and shortcuts to fit your workflow.
- Built-in effects and transitions, including video stabilization, audio correction, and color grading.
- Proxy editing for smoother editing of high-resolution videos.
- Export options for different platforms, devices, and formats.
Kdenlive is a great choice for FunOS users who want a professional yet lightweight video editor without the cost of proprietary software.

How to Install Kdenlive on FunOS
Step 1: Open a Terminal
There are several ways to open a terminal in FunOS:
- Click Menu in the lower-left corner of the screen, then select Terminal.
- Click the Terminal icon in the Tray.
- Press Ctrl + Alt + T on your keyboard.
Step 2: Update the Package List
Before installing any software, it’s good practice to refresh the package list to ensure you get the latest version available in the repository:
sudo apt updateStep 3: Install Kdenlive
Now, install Kdenlive using the following command:
sudo apt install kdenliveStep 4: Reload the Menu
After installation, reload the JWM menu so that Kdenlive appears in the application list:
- Click the Menu button in the lower-left corner.
- Select Reload menu.
Launching Kdenlive
Once installed, you can start Kdenlive by:
- Clicking the Menu button in the lower-left corner.
- Navigating to the Multimedia category.
- Selecting Kdenlive.
This will open the Kdenlive video editor, and you can begin working on your video projects.
How to Uninstall Kdenlive on FunOS
If you no longer need Kdenlive, you can remove it from your system by following these steps:
Step 1: Open a Terminal
Use one of the methods described above to open a terminal.
Step 2: Remove Kdenlive
Run the following command to uninstall Kdenlive and its configuration files:
sudo apt remove --purge kdenliveStep 3: Remove Any Unused Dependencies
Clean up packages that are no longer required:
sudo apt autoremove --purgeStep 4: Remove User Data (Optional)
If you want to completely remove all user data related to Kdenlive (such as project settings, caches, and configurations), run:
rm -rf $HOME/.cache/kdenlive
rm -rf $HOME/.local/share/kdenlive
Step 5: Reload the Menu
Finally, reload the menu to update the application list:
- Click the Menu button in the lower-left corner.
- Select Reload menu.
Conclusion
Kdenlive is an excellent tool for anyone who wants to dive into video editing on FunOS. Its wide range of features, support for many formats, and ease of use make it one of the most popular video editors in the Linux community. With just a few simple commands, you can install it on FunOS, start editing videos, and even uninstall it cleanly if you decide you no longer need it.
Whether you are producing tutorials, editing personal projects, or working on professional content, Kdenlive offers everything you need to bring your ideas to life.

Leave a Reply