Hard Disk Sentinel (HDSentinel) is a powerful tool for monitoring and analyzing the health and performance of hard drives and SSDs. Although it is originally developed for Windows, a Linux version is also available, including a graphical interface (GUI). However, due to the way graphical privilege elevation is handled in different desktop environments, additional configuration is needed to run HDSentinel GUI smoothly on FunOS. This article provides a step-by-step guide on how to install, configure, and uninstall Hard Disk Sentinel on FunOS.
What is Hard Disk Sentinel?
Hard Disk Sentinel is a multi-platform HDD/SSD monitoring and analysis application. It detects, diagnoses, and displays detailed information about your hard disks or solid-state drives. The tool can predict potential disk failures, monitor disk temperature, health status, performance, and provide various alerting options to warn users of potential data loss.
For Linux systems, Hard Disk Sentinel is available in both a console (CLI) version and a graphical (GUI) version. The GUI version requires additional setup on some lightweight desktop environments like the one used in FunOS, which is based on JWM.
How to Install Hard Disk Sentinel on FunOS
Work on: 22.04.5 ✅ | 24.04.4 ✅ | 25.10 ✅ | 26.04 ✅
Follow the steps below to install the Hard Disk Sentinel on FunOS.
Step 1: Download the Hard Disk Sentinel GUI .tar.xz File
1. Open your web browser and go to the Hard Disk Sentinel Linux GUI download page.
2. Click the link labeled hdsentinel_gui64bit.tar.xz.
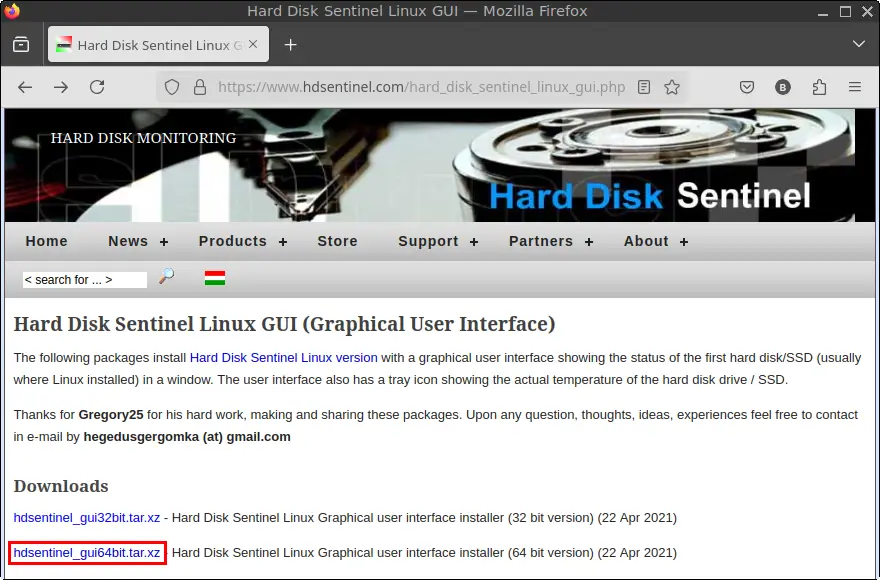
3. Save the file in your Downloads directory.
Step 2: Open a Terminal
You can open the Terminal using any of the following methods:
- Click the Menu in the lower-left corner, then select Terminal
- Click the Terminal icon in the Tray
- Press Ctrl + Alt + T on your keyboard
Step 3: Navigate to the Downloads Directory
cd ~/DownloadsStep 4: Extract the .tar.xz File
tar -xvf hdsentinel_gui64bit.tar.xzStep 5: Navigate to the HDSentinel_GUI Directory
cd HDSentinel_GUIStep 6: Install Hard Disk Sentinel GUI
./install.shThis command installs the console and GUI version into /usr/share/bin/.
Step 7: Navigate to the Home Directory
cdStep 8: Create a Wrapper Script
Hard Disk Sentinel GUI won’t launch properly in FunOS without a wrapper script. Here’s how to create one:
sudo mousepad /usr/share/bin/run_HDSentinel_GUIPaste the following content into the file:
#!/bin/bash
cd /usr/share/bin/
./HDSentinel_GUI
Save and close Mousepad.
Make the script executable:
sudo chmod +x /usr/share/bin/run_HDSentinel_GUIStep 9: Modify the Hard Disk Sentinel GUI Desktop File
mousepad $HOME/.local/share/applications/Hard_Disk_Sentinel_GUI.desktopMake the following changes:
Before:
Exec=/usr/share/bin/HDSentinel_GUI
Icon=/usr/share/icons/HDSentinel_GUI.ico
After:
Exec=/usr/share/bin/run_HDSentinel_GUI
Icon=drive-harddisk
So the complete content becomes:
[Desktop Entry]
Version=2.0.0
Type=Application
Name=Hard Disk Sentinel GUI
Comment=
Categories=System;
Exec=/usr/share/bin/run_HDSentinel_GUI
Icon=drive-harddisk
Path=/usr/share/bin/
Terminal=false
StartupNotify=false
Name[hu]=Hard Disk Sentinel GUI
Name[en_AU]=Hard Disk Sentinel GUI
Name[en_GB]=Hard Disk Sentinel GUI
Comment[hu]=Merevlemezek felügyelete
Comment[en_AU]=Monitoring Hard Drives
Comment[en_GB]=Monitoring Hard Drives
GenericName=Monitoring Hard Drives
Save and close the file.
Step 10: Create a Symbolic Link to the Console Version
sudo ln -sf /usr/share/bin/HDSentinel /usr/bin/hdsentinelThis allows you to run the console version using the hdsentinel command.
Step 11: Remove the Downloaded .tar.xz File
rm -f $HOME/Downloads/hdsentinel_gui64bit.tar.xzStep 12: Reload the Menu
- Click the Menu button in the lower-left corner
- Click Reload menu
Now the Hard Disk Sentinel GUI should appear under the System category in the menu.
Launching Hard Disk Sentinel Console
You can run the console version of HDSentinel using the following command:
sudo hdsentinel [option]You can also run it without any options:
sudo hdsentinelExample output:
Hard Disk Sentinel for LINUX console 0.19e.9986 (c) 2021 info@hdsentinel.com
Start with -r [reportfile] to save data to report, -h for help
Examining hard disk configuration ...
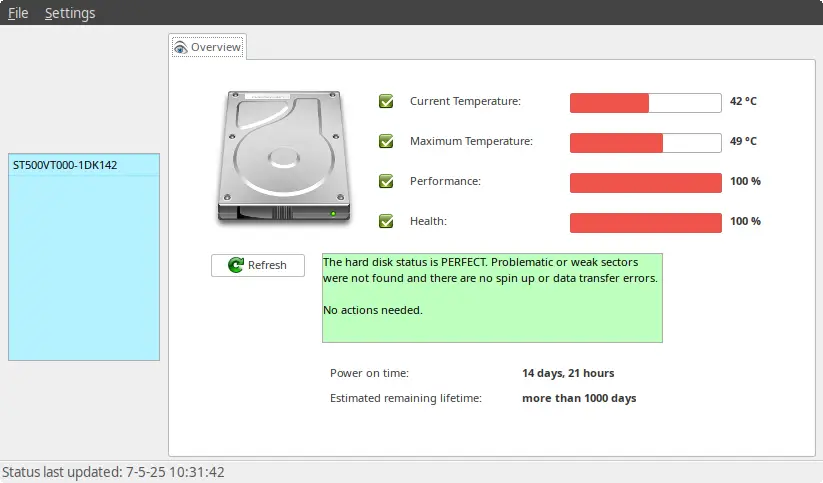
HDD Device 0: /dev/sda
HDD Model ID : ST500VT000-1DK142
HDD Serial No: WBY8QJ1T
HDD Revision : 0001SDC1
HDD Size : 476940 MB
Interface : S-ATA Gen3, 6 Gbps
Temperature : 42 °C
Highest Temp.: 49 °C
Health : 100 %
Performance : 100 %
Power on time: 14 days, 21 hours
Est. lifetime: more than 1000 days
The hard disk status is PERFECT. Problematic or weak sectors were not found and there are no spin up or data transfer errors.
No actions needed.List of available options/switches:
The switches are NOT case sensitive. Upper and lower case can be used to specify them.
- -h – displays help and usage information
- -r [report file] – automatically save report to filename (default: report.txt)
- -html – use with -r to save HTML format report (-html -r report.html)
- -mht – use with -r to save MHT format report (-mht -r report.mht)
- -autosd – detect industrial SD card type and save flag file (see How to: monitor (micro) SD card health and status for more details)
- -dev /dev/sdX – detect and report only the specified device without accessing others
- -devs d1,d2 – detect (comma separated) devices in addition to default ones eg. /dev/sda,/dev/sdb,/dev/sdc
- -onlydevs d1,d2 – detect (comma separated) devices only eg. /dev/sda,/dev/sdb,/dev/sdc
- -nodevs d1,d2 – exclude detection of (comma separated) devices eg. /dev/sda,/dev/sdb,/dev/sdc
- -dump – dump report to stdout (can be used with -xml to dump XML output instead of text)
- -xml – create and save XML report instead of TXT
- -solid – solid output (drive, tempC, health%, power on hours, model, S/N, size)
- -verbose – detailed detection information and save temporary files (only for debug purposes)
- -aam – display acoustic management settings (current and recommended level)
- -setaam drive_num|ALL level(hex)80-FE|QUIET|LOUD – set acoustic level on drive 0..n (or all)
80 or QUIET is the lowest (most silent) setting, FE or LOUD is the highest (fastest) setting
For example: hdsentinel -setaam 0 loud – Configures drive 0 to fastest (loud) setting. Same as hdsentinel -setaam 0 FE
Launching Hard Disk Sentinel GUI
To open the GUI version:
- Click the Menu button in the lower-left corner
- Go to the System category
- Click Hard Disk Sentinel GUI
It should now open without authentication issues.
How to Uninstall Hard Disk Sentinel on FunOS
If you wish to remove Hard Disk Sentinel, follow these steps:
Step 1: Open a Terminal
Use one of the three methods mentioned earlier to open your terminal.
Step 2: Navigate to the HDSentinel_GUI Directory
cd $HOME/Downloads/HDSentinel_GUIStep 3: Remove Hard Disk Sentinel
./uninstall.shStep 4: Remove the Wrapper Script
sudo rm -f /usr/share/bin/run_HDSentinel_GUIStep 5: Remove the Symbolic Link
sudo rm -f /usr/bin/hdsentinelStep 6: Reload the Menu
- Click the Menu button
- Click Reload menu
This will remove the menu entry.
Conclusion
Hard Disk Sentinel is a useful tool for monitoring the health and performance of your hard drives and SSDs. Although it requires a bit of manual setup on FunOS due to graphical authentication limitations in JWM, this guide provides a reliable method to get it working correctly. With both a console and GUI version available, users can choose the interface that best suits their needs.
If you encounter any issues or have suggestions for improving this guide, feel free to contact the FunOS team.