Introduction
Managing your screen brightness is essential for optimal viewing comfort and energy efficiency. In this article, we will guide you through adjusting screen brightness in FunOS using the Xfce4 Power Manager. This approach ensures a flexible and user-friendly way to control brightness levels on laptops and desktops.
Step-by-Step Guide to Adjust Screen Brightness in FunOS
Step 1: Open a Terminal
There are three ways to open a terminal in FunOS:
- Option 1: Click on the Menu button in the bottom-left corner of the screen, then click Terminal.
- Option 2: Click on the Terminal icon in the Tray.
- Option 3: Use the keyboard shortcut Ctrl + Alt + T.
Step 2: Update the Package List
Before installing any packages, it is always recommended to update your package list:
sudo apt updateStep 3: Install the Xfce4 Power Manager
Next, install the Xfce4 Power Manager package:
sudo apt install xfce4-power-managerStep 4: Reload the Menu
To ensure that the newly installed Xfce4 Power Manager appears in the Menu:
- Click on the Menu button in the lower-left corner.
- Click Reload menu.
Step 5: Configure Xfce4 Power Manager
To display the Xfce4 Power Manager in the tray and run it at startup, follow these steps:
Open Xfce4 Power Manager
- Click on the Menu button in the lower-left corner of the screen.
- Navigate to Settings and click Power Manager.
Launch Xfce4 Power Manager if Prompted
You might see a prompt stating:
“Xfce4 Power Manager is not running; do you want to launch it now?”
Click Yes.

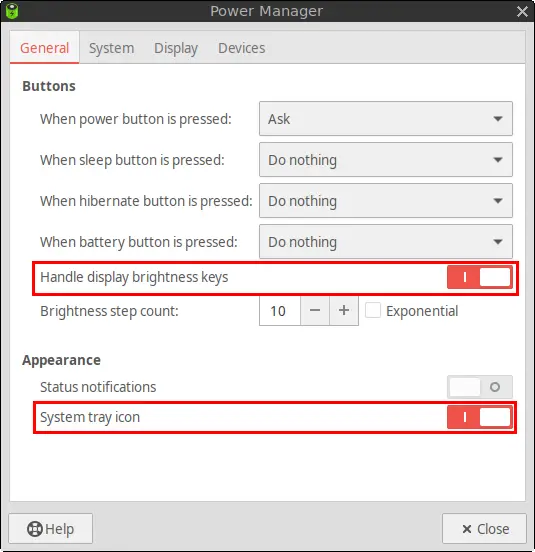
Configure Power Manager Settings
The Power Manager settings will be displayed. Make the following adjustments:
- Enable Handle display brightness keys: This allows you to adjust the brightness using the brightness control buttons on your laptop keyboard.
- Enable System tray icon: This ensures that the Power Manager applet is displayed in the tray for easy access.

After making these changes, click Close to exit the Power Manager settings.
Configure Xfce4 Power Manager to Run at Startup
- Open the start configuration file using Mousepad:
mousepad $HOME/.config/jwm/start- Modify the contents of the file by replacing
cbatticonwithxfce4-power-manager. The modified configuration should look like this:
<?xml version="1.0"?>
<JWM>
    <!-- Startup for program. -->
    <StartupCommand>nitrogen --restore</StartupCommand>
    <StartupCommand>xfce4-power-manager</StartupCommand>
    <StartupCommand>volumeicon</StartupCommand>
    <StartupCommand>nm-tray</StartupCommand>
    <StartupCommand>lxpolkit</StartupCommand>
    <StartupCommand>xscreensaver --no-splash</StartupCommand>
    <StartupCommand>xdg-user-dirs-update</StartupCommand>
</JWM>- Save the file and close Mousepad.
Step 6: Reboot the System
To apply all changes, you need to reboot your system. You can do this by either running the following command in the Terminal:
sudo reboot nowOr, you can click on Menu > Log Out > Reboot.
Adjusting Screen Brightness
For FunOS 24.10 users, if the Xfce4 Power Manager applet does not appear in the tray, please refer to the article: How to Fix Xfce4 Power Manager Applet Not Appearing in the Tray on FunOS 24.10.
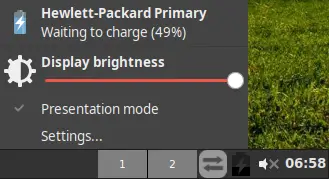
Once your system has rebooted, the Xfce4 Power Manager applet will appear in the tray. You can adjust the screen brightness using one of the following methods:
- Using the Tray Applet: Right-click on the Power Manager applet in the tray. This will display a slider that allows you to adjust the screen brightness to your preference.
- Using Keyboard Keys: If your device has brightness control buttons on the keyboard, they should now function as expected.

Additional Steps to Adjust Screen Brightness on FunOS
If you’ve installed the Xfce4 Power Manager to adjust the screen brightness but still find that the brightness does not change, it may be due to hardware-specific issues on certain laptops. In such cases, adjusting the kernel parameters can provide a solution. Below are the additional steps to resolve this issue:
1. Add the Kernel Parameter acpi_backlight=video
This method directs the kernel to use a specific backlight control interface.
a. Open the GRUB Configuration File:
Open a terminal and run the following command:
sudo mousepad /etc/default/grubb. Modify the GRUB_CMDLINE_LINUX_DEFAULT Parameter:
Locate the following line in the file:
GRUB_CMDLINE_LINUX_DEFAULT="quiet splash"Change it to:
GRUB_CMDLINE_LINUX_DEFAULT="quiet splash acpi_backlight=video"Save the changes and close the Mousepad editor.
c. Update GRUB:
Run the following command to apply the changes:
sudo update-grubd. Restart Your System:
Restart your system for the changes to take effect:
sudo reboot now2. Add the Kernel Parameter acpi_backlight=vendor
If the first method does not resolve the issue, try setting the kernel to use the vendor-specific backlight control.
a. Open the GRUB Configuration File:
Run the following command:
sudo mousepad /etc/default/grubb. Modify the GRUB_CMDLINE_LINUX_DEFAULT Parameter:
Locate the same line:
GRUB_CMDLINE_LINUX_DEFAULT="quiet splash"Change it to:
GRUB_CMDLINE_LINUX_DEFAULT="quiet splash acpi_backlight=vendor"Save your changes and close the editor.
c. Update GRUB:
Run the following command to apply the changes:
sudo update-grubd. Restart Your System:
Restart your computer:
sudo reboot now3. Add the Kernel Parameter acpi_backlight=native
If the above methods still don’t resolve the brightness adjustment issue, use the native option, which can work with modern hardware.
a. Open the GRUB Configuration File:
Run the following command:
sudo mousepad /etc/default/grubb. Modify the GRUB_CMDLINE_LINUX_DEFAULT Parameter:
Locate this line:
GRUB_CMDLINE_LINUX_DEFAULT="quiet splash"Change it to:
GRUB_CMDLINE_LINUX_DEFAULT="quiet splash acpi_backlight=native"Save your changes and exit Mousepad.
c. Update GRUB:
Apply the changes by running:
sudo update-grubd. Restart Your System:
Restart your system to test the new settings:
sudo reboot nowConclusion
By following these steps, you can easily control screen brightness in FunOS. The Xfce4 Power Manager provides a user-friendly way to adjust brightness settings, whether through the system tray or your laptop’s built-in brightness keys. However, if the brightness adjustment doesn’t work on your laptop, trying different kernel parameters such as acpi_backlight=video, acpi_backlight=vendor, or acpi_backlight=native can help resolve the issue by specifying the appropriate backlight control interface for your hardware. This ensures an optimal viewing experience tailored to your system’s configuration.

Leave a Reply