OpenVPN is a powerful and widely-used open-source VPN protocol that enables secure point-to-point or site-to-site connections. In this guide, we’ll walk you through the steps to connect to OpenVPN on FunOS, using a .ovpn configuration file provided by VPNBook. This tutorial is designed for those who prefer using the Terminal and want full control over their VPN connection.
What is OpenVPN?
OpenVPN is an open-source Virtual Private Network (VPN) solution that uses custom security protocols based on SSL/TLS to securely tunnel network traffic. It allows you to create secure connections over the internet, protecting your online identity, encrypting your traffic, and bypassing geo-restrictions or firewalls.
OpenVPN is widely supported across various platforms and is a trusted choice for both individuals and businesses seeking privacy and data protection.
How to Connect to OpenVPN on FunOS
Follow these step-by-step instructions to connect to OpenVPN using the Terminal on FunOS.
Step 1: Prepare the .ovpn File
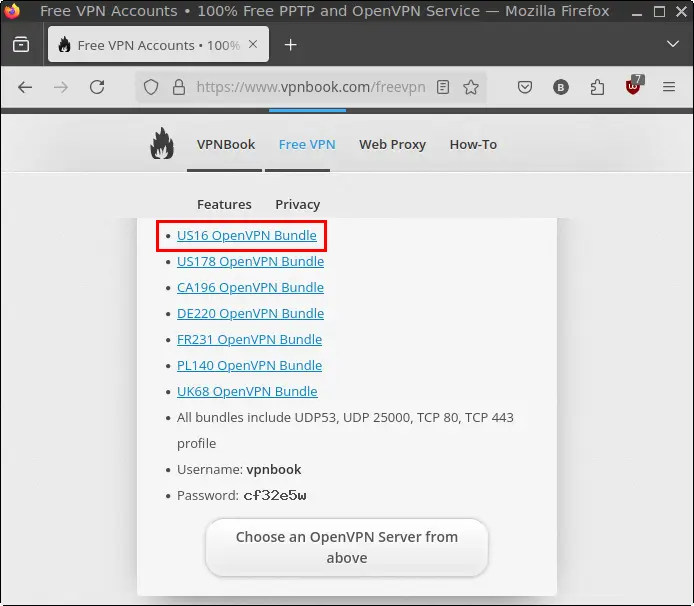
In this tutorial, we will use a free OpenVPN configuration from VPNBook.
- Go to the VPNBook website and download one of the available OpenVPN bundles (e.g.
US16 OpenVPN Bundle). - Extract the archive to your
Downloadsfolder. - We will use
vpnbook-us16-tcp443.ovpnin this guide.
Step 2: Open a Terminal
You can open a Terminal window in one of the following ways:
- Click Menu in the bottom-left corner, then click Terminal.
- Click the Terminal icon in the Tray.
- Press
Ctrl + Alt + Ton your keyboard.
Step 3: Update the Package List
Before installing any packages, make sure your package list is up to date:
sudo apt updateStep 4: Install OpenVPN
Install the core OpenVPN package:
sudo apt install openvpnStep 5: Install the NetworkManager OpenVPN Plugin
Install the plugin that allows NetworkManager (and nmcli) to handle OpenVPN connections:
sudo apt install network-manager-openvpn🔍 This step is essential to enable
.ovpnimport via the Terminal.
Step 6: Edit the .ovpn File
Use any text editor (like mousepad, or nano) to open the .ovpn file you downloaded. Look for this line:
auth-user-passDelete that line, then save the file.
⚠️ This is necessary because we’ll supply the username and password via command line in the next step.

.ovpn FileStep 7: Import the OpenVPN Configuration
Run this command to import the .ovpn configuration into NetworkManager:
nmcli connection import type openvpn file ~/Downloads/vpnbook-openvpn-us16/vpnbook-us16-tcp443.ovpnThis will create a new VPN connection profile named vpnbook-us16-tcp443.
Step 8: Set the VPN Username and Password
Use the following command to set the VPN credentials:
nmcli connection modify vpnbook-us16-tcp443 \
  +vpn.data "connection-type=password-tls, username=vpnbook" \
  vpn.user-name vpnbook \
  +vpn.secrets "password=m34wk9w"
📝 Replace
m34wk9wwith the current password found on VPNBook’s website, as it changes regularly.
Step 9: Connect to the VPN
To initiate the VPN connection, run:
nmcli connection up vpnbook-us16-tcp443If successful, your IP address will now be masked and traffic routed through the VPN server.
Additional Commands
Here are some helpful commands to manage the VPN connection:
- Disconnect from OpenVPN:
nmcli connection down vpnbook-us16-tcp443- Delete the OpenVPN Configuration:
nmcli connection delete vpnbook-us16-tcp443Conclusion
FunOS fully supports connecting to OpenVPN servers via the Terminal using NetworkManager and nmcli. This method is ideal for advanced users who prefer command-line tools and want to avoid additional software. By carefully following each step — especially removing the auth-user-pass line and setting credentials correctly — you can establish a secure VPN connection within minutes.
If you encounter any issues, ensure that:
- The password from VPNBook is still valid.
- The
.ovpnfile is correctly edited. - The necessary packages are installed.
Happy browsing, securely!
Leave a Reply