
AppImage is a portable application format that lets you run Linux applications without installing them through the system package manager. It is particularly useful when an application is unavailable in the Ubuntu repositories or when you want to try a newer version without changing system files.
This guide explains how to download, prepare, run, and remove AppImage applications on FunOS. Krita is used as an example, but the same general steps apply to most AppImage files.
What Is AppImage?
AppImage is a universal software packaging format for Linux. An AppImage usually contains the application and most of the libraries it needs in a single executable file.
Unlike a traditional .deb package, an AppImage does not need to be installed system-wide. After downloading the file and making it executable, you can launch it directly.
Advantages of AppImage
AppImage offers several benefits:
- No traditional installation required: You can run the application directly from the downloaded file.
- Portable: AppImage files can be stored in any directory or carried on a USB drive.
- No administrator privileges required: Most AppImages can be used without entering your password.
- Multiple versions can coexist: You can keep different versions of the same application without package conflicts.
- Easy to remove: Deleting the AppImage file removes the application itself.
Disadvantages of AppImage
AppImage also has some limitations:
- Larger file size: The file may include many of the libraries required by the application.
- Updates may be manual: Unless the AppImage includes its own updater, you must download newer versions yourself.
- Limited desktop integration: Some AppImages do not automatically appear in the application menu.
- User data remains after deletion: Configuration files and other application data may remain in your home directory after the AppImage file is removed.
Why Native Packages Are Usually Preferred
When available, a native package such as a .deb package is generally preferable on FunOS because it:
- Receives updates through APT.
- Integrates more closely with the operating system.
- Can automatically install required dependencies.
- Is easier to track and remove through the package manager.
- May receive additional testing from the distribution or application maintainers.
AppImage is a useful alternative when a native package is unavailable or when you specifically need the AppImage version.
How to Download and Run an AppImage on FunOS
Step 1: Open a Terminal
You can open a terminal in any of the following ways:
- Click Menu in the lower-left corner of the screen, then click Terminal.
- Click the Terminal icon in the Tray.
- Press Ctrl + Alt + T.
Step 2: Update the Package List
Before installing the required package, update the local package list:
sudo apt updateStep 3: Install libfuse2
Many AppImage applications require the FUSE 2 compatibility library. Install it by running:
sudo apt install libfuse2If libfuse2 is already installed, APT will report that the package is already at the newest version.
Step 4: Download the AppImage File
Download the AppImage from the application’s official website or official GitHub repository. Avoid downloading executable files from untrusted third-party websites.
For this tutorial, we will use Krita as an example:
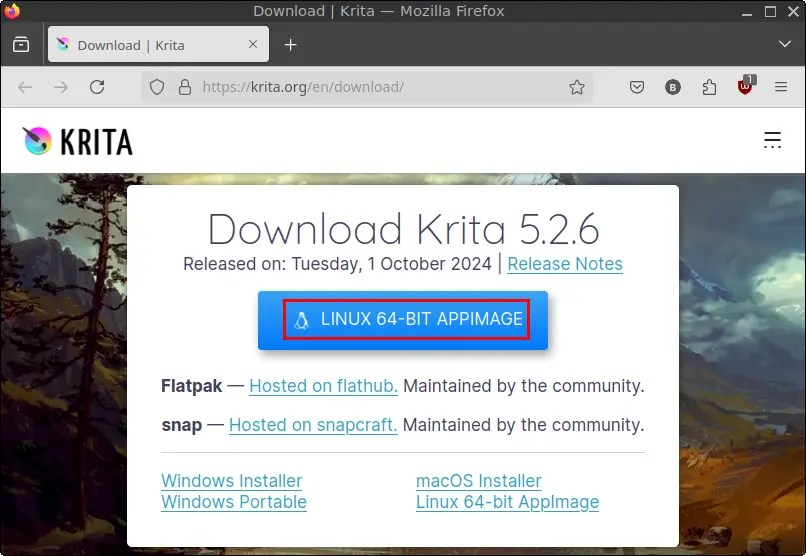
- Open your web browser.
- Go to the Krita download page.
- Find the Linux AppImage download.
- Download the AppImage file.
- Save it in your Downloads directory.
Step 5: Make the AppImage Executable
Files downloaded from the internet are not normally given permission to run as programs automatically. Before launching the AppImage, you must make it executable.
You can do this using the File Manager or the terminal.
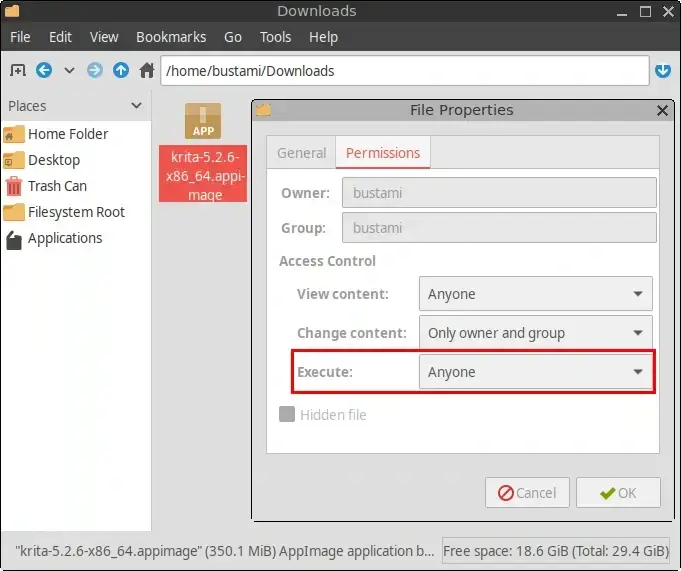
Method 1: Using the File Manager
- Open File Manager.
- Open the Downloads directory or the directory where you saved the AppImage.
- Right-click the AppImage file.
- Select Properties.
- Open the Permissions tab.
- In the Execute section, select Anyone.
- Click OK.
Method 2: Using the Terminal
Open a terminal and navigate to the directory containing the downloaded file:
cd ~/DownloadsDisplay the files in the directory to check the exact AppImage filename:
lsMake the AppImage executable with chmod. For example:
chmod +x krita-5.2.6-x86_64.appimageReplace krita-5.2.6-x86_64.appimage with the exact name of the file you downloaded.
You can usually type the first few characters of the filename and press Tab to complete it automatically.
Step 6: Run the AppImage
After making the file executable, you can launch it from the File Manager or the terminal.
Method 1: Using the File Manager
- Open File Manager.
- Navigate to the directory containing the AppImage.
- Double-click the AppImage file.
- If a confirmation dialog appears, click Execute.
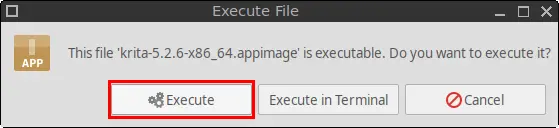
The application should now start. Because an AppImage is not installed traditionally, you can normally launch it again by double-clicking the same file.
Method 2: Using the Terminal
Navigate to the directory containing the AppImage:
cd ~/DownloadsRun the file by placing ./ before its name:
./krita-5.2.6-x86_64.appimageReplace the example filename with the actual name of your AppImage file.
The ./ tells the shell to run the executable file located in the current directory.
Organizing AppImage Files
You can run an AppImage directly from the Downloads directory, but keeping applications there can become confusing over time.
Consider creating a dedicated directory for your AppImage applications:
mkdir -p ~/ApplicationsYou can then move the AppImage into that directory:
mv ~/Downloads/krita-5.2.6-x86_64.appimage ~/Applications/After moving the file, launch it with:
~/Applications/krita-5.2.6-x86_64.appimageReplace the example filename with the name of your downloaded AppImage.
Moving an AppImage does not normally affect the application because it is a self-contained executable file.
How to Remove an AppImage
An AppImage is not installed through APT, so you do not remove it with sudo apt remove. To remove the application itself, simply delete its AppImage file.
Method 1: Using the File Manager
- Open File Manager.
- Navigate to the directory containing the AppImage.
- Select the AppImage file.
- Press Delete to move it to the Trash.
To delete it immediately without moving it to the Trash, press Shift + Delete. Use this option carefully because the file will be removed permanently.
Method 2: Using the Terminal
Navigate to the directory containing the file. For example:
cd ~/DownloadsCheck the exact filename:
lsDelete the AppImage:
rm -f krita-5.2.6-x86_64.appimageReplace the example filename with the actual AppImage filename.
If you stored it in the Applications directory instead, use:
rm -f ~/Applications/krita-5.2.6-x86_64.appimageRemove Application Data (Optional)
Deleting an AppImage removes the application file, but it may not remove configuration files, caches, documents, or other user data created by the application.
For Krita, some related data may be stored in the following directories:
~/.config/krita
~/.local/share/krita
To remove these directories, run:
rm -rf ~/.config/krita
rm -rf ~/.local/share/krita
Be careful when using rm -rf. The command permanently removes the specified directories and their contents without moving them to the Trash.
Only remove application data when you are certain that you no longer need your settings, resources, or other files stored there. The locations used by other AppImage applications may be different.
Troubleshooting
The AppImage Does Not Open
Confirm that the file has executable permission:
chmod +x ~/Downloads/application.AppImageReplace application.AppImage with the actual filename.
You can also launch the AppImage from a terminal to view possible error messages:
cd ~/Downloads
./application.AppImage
Terminal output can help identify missing libraries or other problems.
FUSE-Related Error
If the application reports that FUSE is missing, make sure libfuse2 is installed:
sudo apt update
sudo apt install libfuse2
After installing the package, try launching the AppImage again.
The Application Does Not Appear in the Menu
AppImage files do not always create application-menu entries automatically. In that case, launch the application from the directory where the AppImage is stored.
Some AppImages may offer to create desktop integration when first launched. Only allow this when you trust the application and downloaded it from an official source.
Conclusion
AppImage provides a convenient way to run portable Linux applications on FunOS without performing a traditional system-wide installation. In most cases, you only need to install the FUSE compatibility library, download the AppImage, make it executable, and launch it.
Native .deb packages remain the preferred option when they are available because they provide better system integration and easier updates through APT. However, AppImage is a practical alternative for applications that are unavailable in the Ubuntu repositories or when you need a self-contained version that is easy to move or remove.