
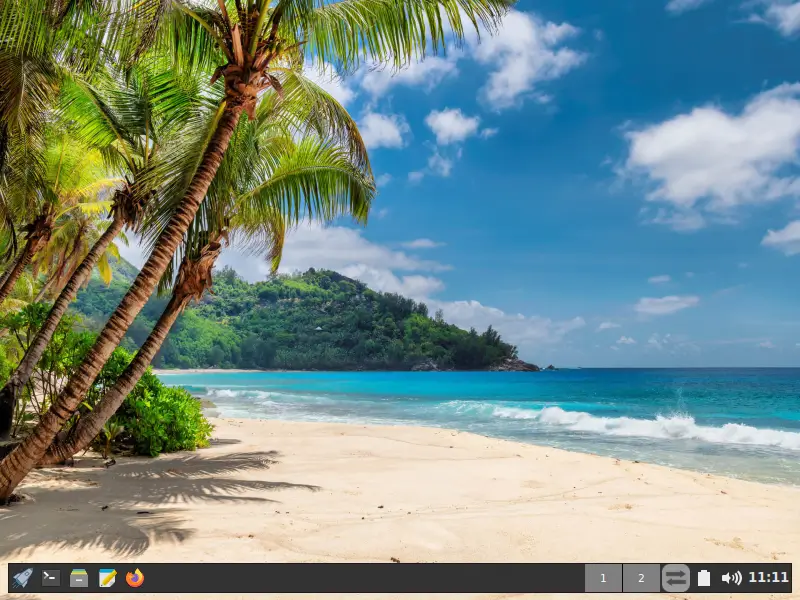
By default, the FunOS JWM tray is positioned directly against the bottom, left, and right edges of the screen. If you prefer a more modern appearance, you can add a small amount of space around the tray so that it appears to float above the desktop.
This layout is inspired by the floating panel available in KDE Plasma. Although JWM does not provide all of KDE Plasma’s visual effects, such as rounded corners, blur, and advanced shadows, it can create a similar floating layout by adjusting a few values in the JWM tray configuration file.
This guide explains how to back up the current configuration, edit the tray position, check the configuration for errors, and apply the change.
What You Will Change
The default FunOS tray configuration begins with the following line:
<Tray x="0" y="-1" height="30" autohide="off" delay="1000">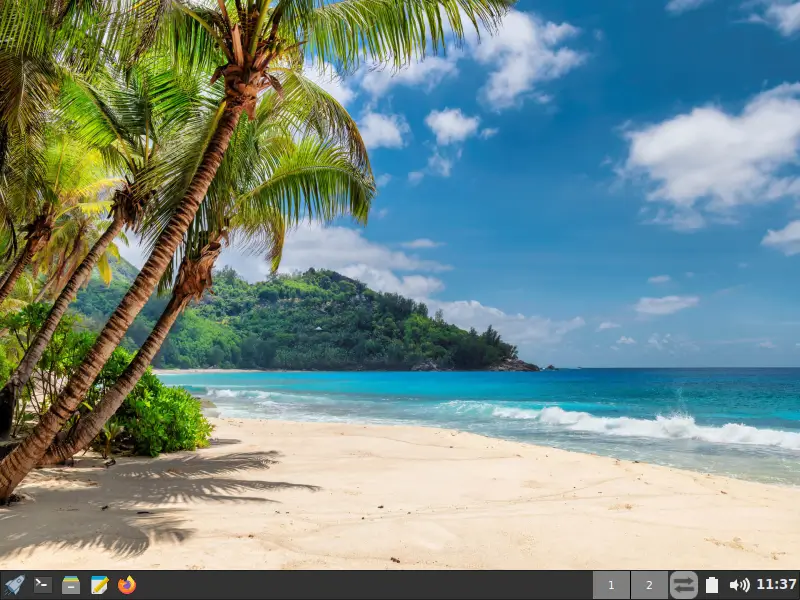
To create a floating tray, you will replace it with:
<Tray x="0" y="-8" halign="center" width="-16" height="30" autohide="off" delay="1000">This change creates approximately:
- 8 pixels of space below the tray
- 8 pixels of space on the left side
- 8 pixels of space on the right side
The tray remains centered and continues to use its original 30-pixel height.
Step 1: Open a Terminal
You can open a terminal in FunOS using any of the following methods:
- Click the Menu button in the lower-left corner of the screen, and then click Terminal.
- Click the Terminal icon in the tray.
- Press Ctrl + Alt + T.
Step 2: Back Up the Tray Configuration File
Before editing the JWM tray configuration, create a backup copy of the original file.
Run:
cp ~/.config/jwm/tray ~/.config/jwm/tray.bakThe cp command copies the current tray configuration to a new file named tray.bak.
If you make a mistake or decide to restore the original tray later, you can use this backup.
Step 3: Open the Tray Configuration File
Open the tray configuration file in Mousepad:
mousepad ~/.config/jwm/trayThe ~ symbol represents your home directory. Therefore, the full configuration file is located at:
~/.config/jwm/trayThis file controls the contents, position, size, and behavior of the FunOS JWM tray.
Step 4: Find the Opening Tray Line
Near the beginning of the file, find this line:
<Tray x="0" y="-1" height="30" autohide="off" delay="1000">This is the opening <Tray> element. It defines the tray’s position, height, automatic hiding behavior, and delay.
Do not change the closing </Tray> element near the end of the file.
Step 5: Replace the Tray Line
Replace the original line with:
<Tray x="0" y="-8" halign="center" width="-16" height="30" autohide="off" delay="1000">The beginning of the file should now look similar to this:
<?xml version="1.0" encoding="UTF-8"?>
<JWM>
    <!-- Floating tray near the bottom of the screen. -->
    <Tray x="0" y="-8" halign="center" width="-16" height="30" autohide="off" delay="1000">
Save the file by pressing Ctrl + S, and then close Mousepad.
Understanding the Tray Settings
The modified line contains several settings:
<Tray x="0" y="-8" halign="center" width="-16" height="30" autohide="off" delay="1000">x="0"
This sets the tray’s horizontal reference position.
Because the tray also uses halign="center", JWM centers it horizontally on the screen.
y="-8"
This positions the tray relative to the bottom edge of the screen.
The negative value places the tray near the bottom while leaving a small visible gap underneath it. A larger negative value moves the tray farther upward.
For example:
y="-12"creates a larger gap below the tray than:
y="-8"halign="center"
This tells JWM to center the tray horizontally.
Centering is important because the tray is slightly narrower than the screen. It ensures that the empty space is distributed evenly between the left and right sides.
width="-16"
A negative width tells JWM to make the tray narrower than the screen by the specified amount.
In this case:
width="-16"makes the tray 16 pixels narrower than the screen.
Because the tray is centered, the remaining space is divided approximately equally:
- 8 pixels on the left
- 8 pixels on the right
height="30"
This keeps the tray height at 30 pixels, which is the default tray height in FunOS.
You can increase this value if you prefer a taller tray, but doing so may also require adjusting icon sizes and other tray elements.
autohide="off"
This keeps the tray visible at all times.
Changing it to on would enable automatic hiding, but that is not required for the floating layout.
delay="1000"
This sets the automatic hiding delay in milliseconds.
Because automatic hiding is disabled, this value does not affect the normal floating tray layout.
Step 6: Check the JWM Configuration
Before applying the change, check the JWM configuration for XML errors.
Run:
jwm -pThe -p option tells JWM to parse and validate its configuration files without starting another window manager session.
If the configuration is valid, the command should finish without reporting an error.
If an error appears, reopen the tray file and check for common problems such as:
- A missing quotation mark
- A missing closing angle bracket
- An accidentally deleted XML element
- An incorrect opening or closing tag
Open the file again with:
mousepad ~/.config/jwm/trayCorrect the problem, save the file, and run jwm -p again.
Step 7: Restart JWM
After confirming that the configuration is valid, restart JWM:
jwm -restartThe desktop may briefly refresh while JWM reloads its configuration.
The FunOS tray should now appear slightly above the bottom edge of the screen, with a small gap on both sides.
Your open applications should remain running when JWM restarts.
Adjusting the Floating Space
You can customize the amount of space around the tray by changing the y and width values.
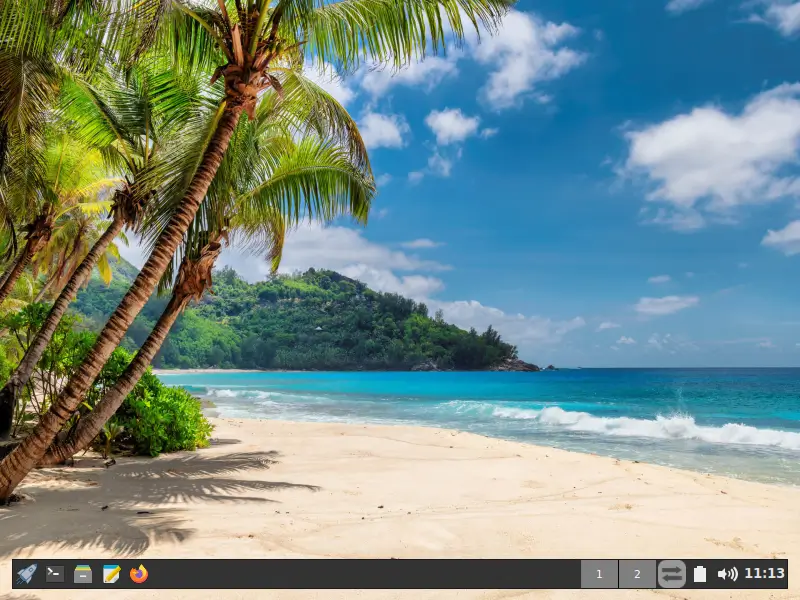
Create a Larger Gap Around the Tray
For approximately 12 pixels of space on the left, right, and bottom, use:
<Tray x="0" y="-12" halign="center" width="-24" height="30" autohide="off" delay="1000">Because the tray is 24 pixels narrower than the screen and horizontally centered, approximately 12 pixels remain on each side.
Create a Smaller Gap
For approximately 5 pixels of space around the tray, use:
<Tray x="0" y="-5" halign="center" width="-10" height="30" autohide="off" delay="1000">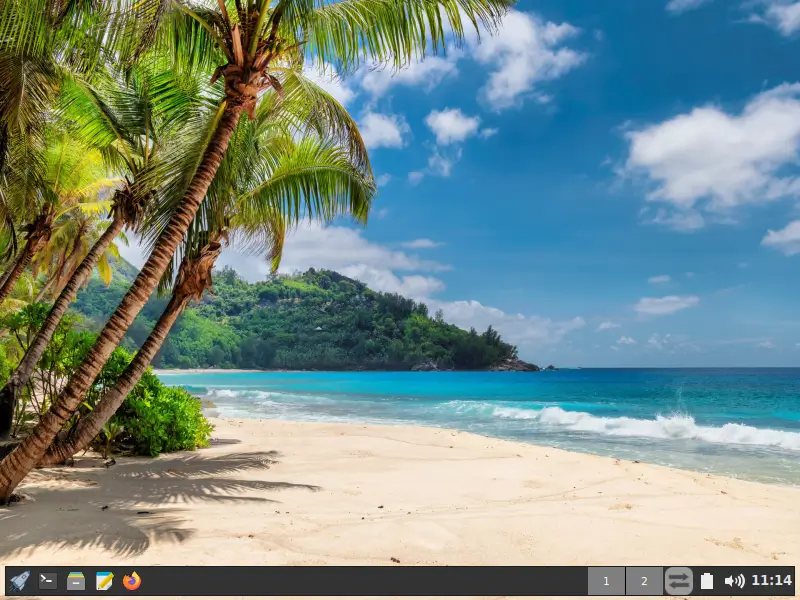
Use Different Horizontal and Bottom Margins
The horizontal and bottom margins do not have to be identical.
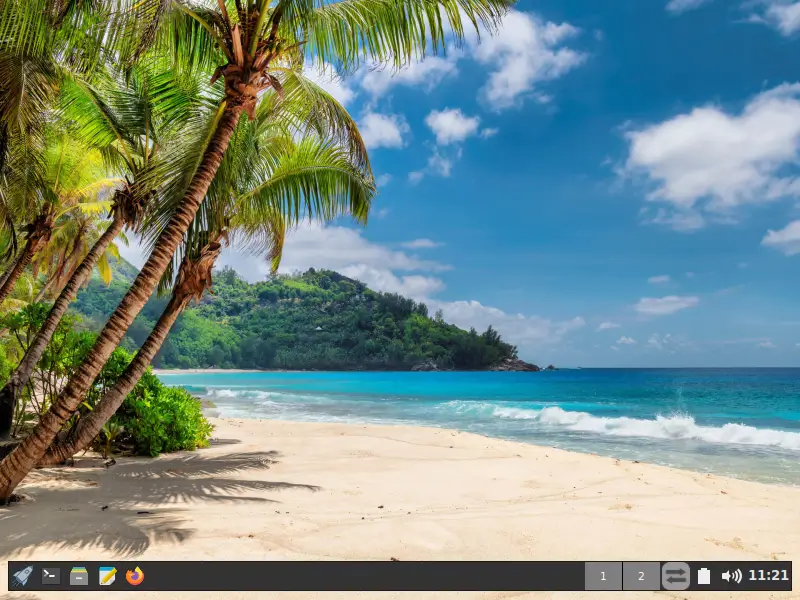
For example:
<Tray x="0" y="-10" halign="center" width="-16" height="30" autohide="off" delay="1000">This creates approximately:
- 8 pixels on the left
- 8 pixels on the right
- 10 pixels below the tray
After making any adjustment, save the file and check it again:
jwm -pThen restart JWM:
jwm -restartRecommended Configuration
For most FunOS users, the following configuration provides a subtle floating effect without taking up too much screen space:
<Tray x="0" y="-8" halign="center" width="-16" height="30" autohide="off" delay="1000">It preserves the default FunOS tray height while adding an even, approximately 8-pixel margin around the left, right, and bottom edges.
How to Restore the Original Tray
If you created the backup earlier, you can restore the original configuration with:
cp ~/.config/jwm/tray.bak ~/.config/jwm/trayCheck the restored configuration:
jwm -pThen restart JWM:
jwm -restartThe tray should return to its original position against the bottom edge of the screen.
Restoring the Default Line Manually
If the backup file is unavailable, open the tray configuration:
mousepad ~/.config/jwm/trayReplace the modified opening line with the default FunOS configuration:
<Tray x="0" y="-1" height="30" autohide="off" delay="1000">Save the file, check it:
jwm -pThen restart JWM:
jwm -restartLimitations
This modification changes the position and width of the JWM tray, creating an appearance similar to KDE Plasma’s floating panel.
However, it does not add all KDE Plasma visual effects. JWM does not natively provide features such as:
- Rounded corners
- Background blur
- Adaptive panel floating
- Advanced drop shadows
- Automatic floating based on maximized windows
- KDE Plasma panel widgets
The result is therefore best described as a KDE Plasma–style floating layout, rather than a complete reproduction of the KDE Plasma panel.
Conclusion
Creating a floating tray in FunOS requires changing only one line in the JWM tray configuration file.
The recommended configuration is:
<Tray x="0" y="-8" halign="center" width="-16" height="30" autohide="off" delay="1000">The y value creates space below the tray, while the negative width makes it narrower than the screen. The halign="center" setting centers the tray so that the left and right margins remain balanced.
After saving the file, use jwm -p to check the configuration and jwm -restart to apply it. The result is a simple, modern floating tray that preserves the lightweight design of FunOS while giving the desktop an appearance inspired by KDE Plasma.