Dropbox is a popular cloud storage service that allows you to sync files between your computer and the cloud. On FunOS, Dropbox can be installed using the official .deb package provided by Dropbox for Ubuntu-based systems.
Because FunOS uses the JWM window manager with a lightweight system tray, Dropbox does not fully integrate out of the box. However, with the help of snixembed, tray icon support can be enabled so that Dropbox runs normally and its icon appears correctly in the JWM tray.
This article explains the installation process step by step, including the additional components required for tray compatibility, so you can clearly understand what each command does.
What Is Dropbox?
Dropbox is a cloud storage and file synchronization service developed by Dropbox, Inc. It allows you to:
- Store files securely in the cloud
- Automatically sync files across multiple devices
- Share files and folders with other users
- Access your data from Linux, Windows, macOS, and mobile devices
On Linux, Dropbox is distributed as a precompiled .deb package for Ubuntu and Ubuntu-based distributions such as FunOS.

How to Install Dropbox on FunOS
Work on: 22.04.5 ✅ | 24.04.4 ✅ | 25.10 ✅ | 26.04 ✅
Step 1: Download the Dropbox .deb File
First, you need to download the official Dropbox installer package for Linux.
- Open your web browser.
- Visit the Dropbox download page for Linux:
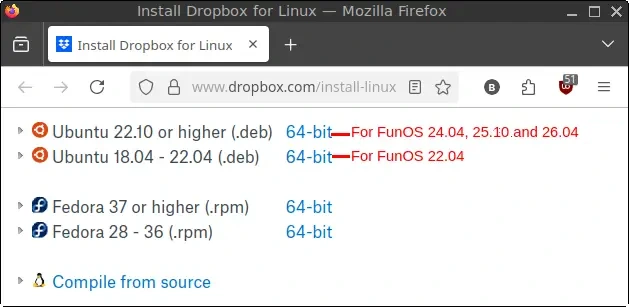
https://www.dropbox.com/install-linux - Choose the
.debpackage that matches your FunOS version:- For FunOS 22.04: select “Ubuntu 18.04 – 22.04 (.deb)”
- For FunOS 24.04, 25.10, and 26.04: select “Ubuntu 22.10 or higher (.deb)”
- Save the downloaded file in your Downloads directory.
Step 2: Open a Terminal
You will perform the installation using the Terminal. There are several ways to open it on FunOS:
- Click Menu in the lower-left corner, then click Terminal
- Click the Terminal icon in the Tray
- Press Ctrl + Alt + T on your keyboard
Step 3: Update the Package List
Before installing new software, it is recommended to update the local package list so FunOS knows about the latest available packages.
Run the following command:
sudo apt updateStep 4: Install the Required Python Dependency
Dropbox uses Python components internally. On FunOS, the following package is required for proper installation.
Install it with:
sudo apt install python3-gpgStep 5: Install libappindicator3-1
Dropbox uses AppIndicator technology to provide its system tray icon. On FunOS, the required AppIndicator library is not installed by default, so it must be added manually.
Installing libappindicator3-1 ensures that Dropbox can communicate properly with tray-embedding tools such as snixembed, allowing the Dropbox icon to appear and function correctly in the JWM tray.
Run the following command:
sudo apt install libappindicator3-1Once the installation is complete, continue to the next step to install and configure snixembed for tray integration.
Step 6: Install snixembed
Dropbox uses modern AppIndicator technology, which is not natively supported by the default JWM tray.
snixembed is a small helper tool that embeds modern AppIndicator-based tray icons into a traditional XEmbed system tray. When properly installed and started with JWM, snixembed allows Dropbox to run normally and display its tray icon on FunOS.
After installing and enabling snixembed, Dropbox works smoothly on FunOS, including background operation and tray icon visibility.
1. Install Build Dependencies
To compile snixembed from source, you first need to install the required build tools and libraries:
sudo apt install build-essential valac git libdbusmenu-gtk3-dev2. Download the snixembed Source Code
Change to the temporary directory and clone the source repository:
cd /tmp
git clone https://git.sr.ht/~steef/snixembed
3. Enter the snixembed Directory
cd snixembed4. Compile snixembed
Compile the source code using make:
make5. Install snixembed
Install the compiled binary into the system:
sudo make install6. Remove Build Dependencies (Optional)
After installation, the build dependencies are no longer required. You can remove them to keep the system clean:
cd
sudo apt remove --purge build-essential valac git libdbusmenu-gtk3-dev
sudo apt autoremove --purge
Step 7: Configure snixembed to Run at Startup
To ensure snixembed starts automatically every time you log in, you need to add it to the JWM startup configuration.
1. Open the JWM startup configuration file:
mousepad $HOME/.config/jwm/start2. Add the following line before the closing </JWM> tag:
<StartupCommand>snixembed --fork</StartupCommand>Example startup section:
<?xml version="1.0" encoding="UTF-8"?>
<JWM>
    <!-- Startup for program. -->
    <StartupCommand>nitrogen --restore</StartupCommand>
    <StartupCommand>cbatticon</StartupCommand>
    <StartupCommand>volumeicon</StartupCommand>
    <StartupCommand>nm-tray</StartupCommand>
    <StartupCommand>lxpolkit</StartupCommand>
    <StartupCommand>xscreensaver --no-splash</StartupCommand>
    <StartupCommand>xdg-user-dirs-update</StartupCommand>
    <StartupCommand>snixembed --fork</StartupCommand>
</JWM>
3. Save the file and close Mousepad.
Step 8: Navigate to the Downloads Directory
Next, move to the directory where the Dropbox .deb file was downloaded:
cd ~/DownloadsStep 9: Install Dropbox
Install the Dropbox package using apt:
sudo apt install ./dropbox_*.debThis command will also install any additional dependencies required by Dropbox.
Step 10: Remove the Downloaded .deb File
After installation is complete, you can remove the installer file:
rm -f dropbox_*.debStep 11: Reload the Menu
Note: Starting with FunOS 24.04.4 LTS (Build 20260618) and FunOS 26.04 LTS (Build 20260618), the menu updates automatically, so you can skip this step.
To ensure new menu entries appear correctly:
- Click Menu in the lower-left corner.
- Click Reload menu.
Step 12: Log Out and Log Back In
Finally, log out and log back in so all changes take effect:
- Click Menu > Log Out
- Click Logout
- Log back in to FunOS
Launching Dropbox
After completing the installation and logging back in, you can try launching Dropbox from the FunOS menu.
- Click the Menu button in the lower-left corner of the screen.
- Look in the Internet category.
- Click Dropbox.
How to Uninstall Dropbox on FunOS
If you no longer need Dropbox, or if you want to remove it from your system, you can safely uninstall Dropbox and all related components by following the steps below.
Step 1: Open a Terminal
You can open the Terminal using one of the following methods:
- Click Menu in the lower-left corner, then click Terminal
- Click the Terminal icon in the Tray
- Press Ctrl + Alt + T
Step 2: Remove Dropbox
Remove the Dropbox package from the system:
sudo apt remove --purge dropboxThis command removes Dropbox along with its system-wide configuration files.
Step 3: Remove Any Unused Dependencies
After removing Dropbox, clean up unused packages:
sudo apt autoremove --purgeStep 4: Remove the Repository and Key (Optional)
Dropbox adds its own repository and signing key. You can remove them manually if they are still present.
sudo rm -f /etc/apt/sources.list.d/dropbox.list
sudo rm -f /etc/apt/keyrings/dropbox.asc
Step 5: Update the Package List
Refresh the package list after removing the repository:
sudo apt updateStep 6: Remove User Data (Optional)
If you also want to remove all Dropbox user data and local sync folders, run the following commands:
rm -rf $HOME/.dropbox
rm -rf $HOME/.dropbox-dist
rm -rf $HOME/Dropbox
rm -f $HOME/.config/autostart/dropbox.desktop
Warning:
This step permanently deletes your local Dropbox data. Make sure your files are safely backed up before proceeding.
Step 7: Remove snixembed
If you installed snixembed from source, remove its installed files manually.
sudo rm -f /usr/bin/snixembed
sudo rm -f /usr/share/man/man1/snixembed.1
Step 8: Remove snixembed from Startup
To prevent snixembed from starting automatically, remove it from the JWM startup configuration.
1. Open the startup configuration file
mousepad $HOME/.config/jwm/start2. Remove the following line:
<StartupCommand>snixembed --fork</StartupCommand>Resulting startup section:
<?xml version="1.0" encoding="UTF-8"?>
<JWM>
    <!-- Startup for program. -->
    <StartupCommand>nitrogen --restore</StartupCommand>
    <StartupCommand>cbatticon</StartupCommand>
    <StartupCommand>volumeicon</StartupCommand>
    <StartupCommand>nm-tray</StartupCommand>
    <StartupCommand>lxpolkit</StartupCommand>
    <StartupCommand>xscreensaver --no-splash</StartupCommand>
    <StartupCommand>xdg-user-dirs-update</StartupCommand>
</JWM>
3. Save the file and close Mousepad.
Step 9: Reload the Menu
Note: Starting with FunOS 24.04.4 LTS (Build 20260618) and FunOS 26.04 LTS (Build 20260618), the menu updates automatically, so you can skip this step.
Finally, reload the FunOS menu to apply the changes:
- Click Menu in the lower-left corner.
- Click Reload menu.
Conclusion
This article has shown how to install Dropbox on FunOS using the official Dropbox package and how to enable proper tray integration on the JWM desktop using snixembed. With this configuration, Dropbox runs smoothly and the tray icon appears correctly in the default FunOS tray.
It has also explained how to completely remove Dropbox and related components if needed. This approach allows FunOS users to continue using the lightweight JWM environment while still enjoying full Dropbox functionality, without switching to a heavier desktop or panel.